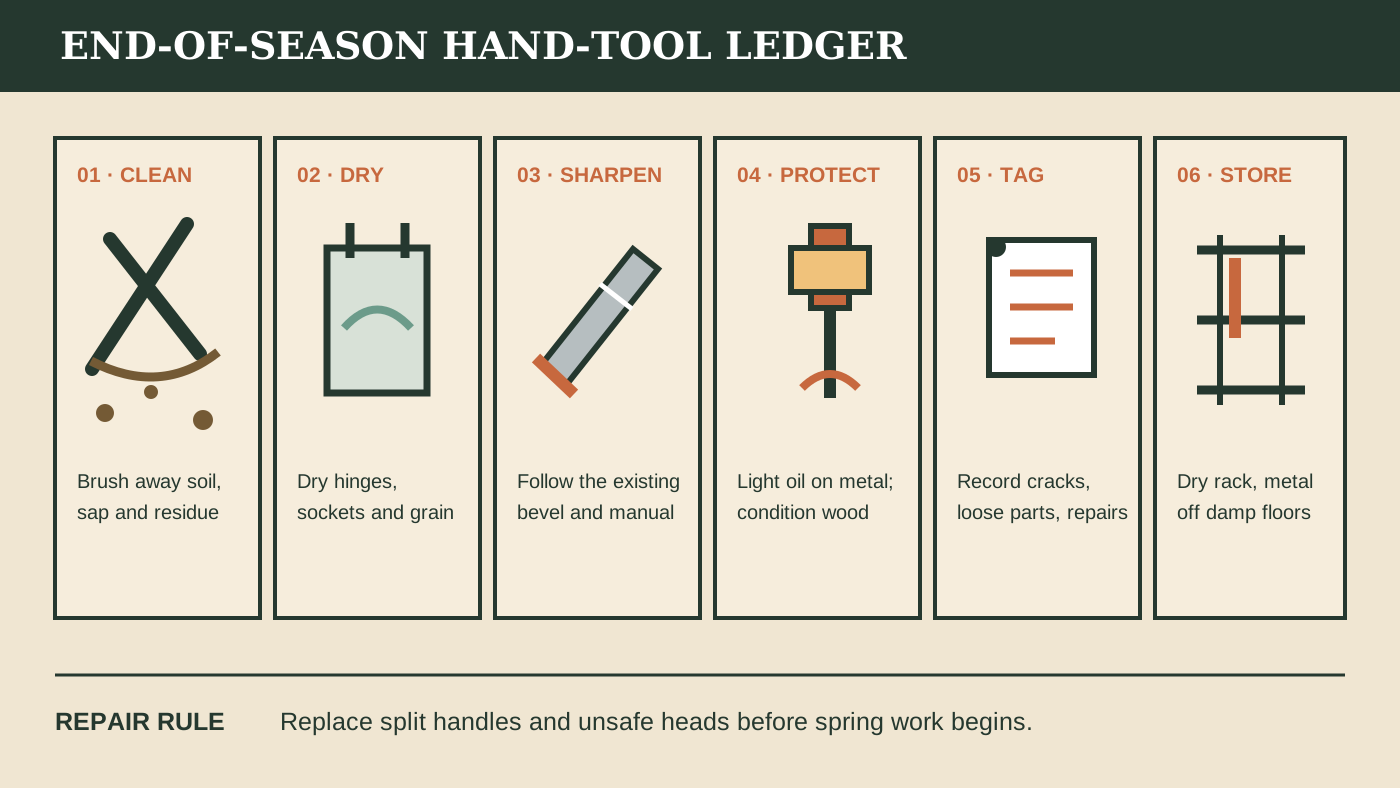
Why the fall tool audit earns its place
Soil, plant sap, fertilizer salts, moisture and damaged finishes keep working after the garden stops. Oregon State University Extension recommends washing and drying tools, sharpening appropriate blades, oiling moving parts and treating wooden handles before winter storage. Utah State University Extension likewise calls for cleaning, sharpening, light oil on metal and linseed oil on wooden handles, followed by dry protected storage.
Those steps do more than improve appearance. A clean surface reveals a hairline crack, mushroomed striking face, loose socket, bent tine or blade gap that dirt can hide. A dry pivot is less likely to seize. A maintained edge requires less force. A written repair tag prevents the familiar spring mistake of returning a defective tool to work because no one remembers why it was set aside.
Public tool-care discussions often jump directly to grinders, homemade disinfectant formulas or a bucket of oily sand. The recurring reader need is simpler: what order should the jobs happen in, and which jobs should be handed to a professional? This ledger keeps inspection ahead of aggressive maintenance and separates ordinary cleaning from disease-control disinfection.
Build a work lane before gathering tools
Choose a well-lit, ventilated bench away from children, animals, ignition sources and food preparation. Set up a stable work surface, a stiff brush, scraper, clean rags, warm water and detergent, rust-removal abrasives appropriate to the tool, the correct hand file or stone, light lubricating oil, handle finish specified by the source or maker, labels and a repair log. Add eye protection and any gloves or other protective equipment required by product labels and the task.
Do not collect every sharp edge into one pile. Keep long-handled tools supported so they cannot fall. Close or sheath cutting tools when they are waiting. Remove batteries from powered equipment only as the manual directs; this guide covers manual shovels, spades, hoes, forks, trowels, pruners and loppers rather than chainsaws, mowers or powered cultivators.
| Tool group | First inspection | Likely service lane |
|---|---|---|
| Shovels, spades, hoes | Socket, handle grain, edge, bends and rust | Clean, smooth edge, protect metal and wood |
| Forks and cultivators | Bent or cracked tines, loose head, handle | Clean, rust control, repair evaluation |
| Bypass pruners and loppers | Blade alignment, pivot, spring, lock and grips | Clean, disinfect when needed, sharpen, lubricate |
| Anvil pruners | Blade, anvil wear, pivot and replaceable parts | Follow model instructions; do not use bypass assumptions |
| Pruning saws and damaged blades | Teeth, cracks, corrosion, guards and handles | Professional service or replacement |
Step 1: inventory before cleaning
Lay tools out by type and assign each a short identifier. Photograph both sides and write the condition before work begins. Check that the head is secure, the handle has no split running with the grain, fasteners are present, cutting parts close correctly and safety locks work. Mark tools as ready, routine service, repair, professional service or retire.
Do not assume a replacement handle is a simple universal part. Socket shape, eye dimensions, wedge method, handle species, length and intended striking load matter. If you cannot verify the fit and installation method, use qualified repair service or replace the tool. A loose head is not fixed by storing it until spring.
The inventory also stops duplicate buying. Count files, replacement springs, pivot nuts, sheaths and wall hooks already on hand. Homesteading Supplier does not publish prices, stock claims or checkout because supplier authorization and current terms have not been established. The field list exists to define fit and documentation before any purchase.
Step 2: remove soil and plant residue
Start dry. Knock or brush off loose soil outdoors where it will not enter drains. Use a stiff brush for rough metal and a scraper that will not gouge the surface for packed soil or sap. Oregon State's tool-care sheet recommends brushing away dirt, following with a dry rag, then using a damp rag only when needed and drying the tool afterward.
For pruners and loppers, open the blades and clean the pivot area without placing fingers in the cutting path. Follow the manufacturer instructions before disassembly; springs and washers can be model-specific. Heavy sap may need a compatible cleaner, but check handle, coating and plastic compatibility and follow the label. Never mix solvents, disinfectants or cleaners.
Tools used around compost, manure or harvest containers deserve special handling. Penn State Extension's current home-garden food-safety guidance identifies garden tools and harvest containers as possible cross-contamination sources. Keep equipment used for manure separate from harvest tools, remove soil after use and store clean equipment in a dry location.
Step 3: decide whether cleaning is enough
Routine winter storage needs clean, dry tools. Disease work may also require disinfection. University of Minnesota Extension emphasizes that dirt and debris interfere with disinfection, so visible material must come off first. A tool that cut a diseased plant should be handled according to the plant problem, the tool material and an effective labeled product.
Read the disinfectant label for compatible surfaces, contact time, ventilation and protective equipment. Never combine bleach, ammonia, acids, alcohol or other products. Keep chemicals out of reach of children and vulnerable adults. When a label and Extension guidance differ from a social-media recipe, use the label and authoritative guidance.
Ordinary soil
Brush, wash only as needed and dry fully. Disinfection is not automatically required after every routine garden task.
Disease contact
Identify the disease context, clean first, then use a compatible effective disinfectant exactly as directed.
Harvest contact
Keep harvest tools and containers clean, dry and separate from manure-handling equipment.
Step 4: dry the places that trap water
Dry the blade face, underside, socket, rivets, pivot, spring recess, fastener heads and the transition between metal and wood. Stand long-handled tools so water cannot pool in a socket, then finish with a dry rag. Do not close a damp pruner and put it in a sheath.
Inspect again after drying. Rust may appear where soil hid it. Fine surface rust may be removed with a wire brush, steel wool or sandpaper appropriate to the finish, as Oregon State guidance describes. Deep pitting at a load-bearing connection, a cracked blade or metal loss near a pivot calls for repair evaluation rather than cosmetic sanding.
Fertilizer residue is especially corrosive. Penn State's farm-equipment storage guidance notes that salts in fertilizer accelerate metal corrosion. Clean spreaders, scoops and tools that contacted fertilizer thoroughly and keep them in a storage zone where leaking bags cannot recoat clean metal.
Step 5: sharpen only the edge you understand
Utah State advises sharpening the beveled side of hand-tool blades with a hand file or ceramic sharpening stone. That existing bevel is the map. Secure the tool so it cannot slip, work away from the body, preserve the original angle and remove only enough metal to restore a sound edge. Wear eye protection and keep hands out of the file path.
Bypass pruners generally have one beveled cutting blade that passes a flatter counter-blade. Anvil pruners work differently. Hedge shears, serrated edges, pruning saws and specialty hoes can have model-specific geometry. Do not flatten a bevel, sharpen both faces by habit or put a power grinder to a thin blade without instructions and skill; heat and excess removal can damage it.
Oregon State recommends professional service for pruning saws and chainsaws. Professional service is also sensible for badly nicked blades, bent loppers, loose forged heads, uncertain bevels or any tool you cannot secure safely. A sharp unsafe tool is worse than a dull tool tagged for repair.
Step 6: protect metal, pivots and wooden handles
After the tool is clean and fully dry, wipe exposed metal with a light protective oil recommended by the authoritative method or manufacturer. Use a small amount and remove excess; the goal is a protective film, not a dripping surface that attracts grit. Lubricate moving joints according to the tool instructions, then operate the joint to distribute the lubricant and wipe away residue.
Inspect wooden handles for raised grain, splinters, cracks, rot and loose fit. Oregon State recommends smoothing rough spots and maintaining linseed or mineral oil; its seasonal guidance specifically mentions linseed oil to help prevent cracking. Follow the finish instructions, allow oily rags to dry or be stored and disposed of according to the product's fire-safety label, and never leave oil-soaked rags crumpled together.
Do not coat a split handle and call it repaired. Finish can slow drying and checking in sound wood, but it cannot restore structural fibers. Mark the tool out of service until the correct handle is installed or the tool is replaced.
Step 7: turn defects into a repair queue
Attach a durable tag that states the defect, date, tool identifier and next action. “Needs work” is too vague. Write “bypass pruner pivot loosens after five cuts,” “shovel handle split 4 inches below socket,” or “fork tine bent inward; professional evaluation.” Photograph the defect and store the note in the seasonal ledger.
Separate ready tools from repair tools. A red-tag rack or closed repair bin keeps someone from grabbing the unsafe item during a rushed spring morning. Order only after recording dimensions, model numbers, material compatibility and the current repair procedure. If a replacement part is not documented for the exact tool, do not imply that a visually similar part fits.
Step 8: store clean tools where damp cannot reach
Store tools in a clean, dry, protected area. Oregon State specifically cautions against keeping wooden parts in contact with soil or concrete. Use a rack, shelf or supported wall system that holds the weight and keeps sharp edges from face and hand level. Do not create a row of leaning long tools that can fall when one is removed.
Keep metal above wet floors, roof drips and snowmelt paths. Separate fertilizers, deicing salts and pool chemicals from clean tools. Protect sheathed blades from condensation and inspect the storage area after the first heavy rain or temperature swing. A dry tool placed in a damp shed is not winterized for long.
Make the spring restart visible: group ready tools by job, place the repair queue beside the written list and schedule professional service before the seasonal rush. Note which tools felt awkward, too heavy or poorly sized. Ergonomic fit is a legitimate replacement criterion, but it should be based on the user's work and measurements rather than a promotional claim.
A buying brief for hand-tool repair and storage
When a tool, part or rack needs replacement, request documentation instead of relying on a product photo. Record:
- tool model, head or socket dimensions and approved replacement part;
- blade type, bevel, steel or coating and sharpening instructions;
- handle material, length, grip diameter, eye dimensions and installation method;
- fastener, pivot, spring and lock availability;
- cleaner, disinfectant, lubricant and finish compatibility;
- rack load rating, mounting hardware, stud or masonry requirements and tool spacing;
- current warranty, repair policy and replacement-part path;
- manufacturer safety instructions and protective equipment.
No branded listing, price, inventory signal or checkout is active on this site. A useful supply page begins with fit, maintenance and repair evidence; commercial terms come only after supplier authorization.
Connect the tool rack to the winter work plan
Finish water-system work before storing the tools needed to complete it. The garden irrigation shutdown ledger covers hoses, timers, filters, regulators and drain paths. For poultry areas, use the coop ventilation audit and winter water-station audit before filing the repair list. The shared habit is simple: inspect while the system is still familiar, then leave a dated record for spring.
Sources checked
- Oregon State University Extension: End-of-Season Garden Tasks Make for a Smoother Start in Spring, reviewed 2025.
- Oregon State University Extension: Care and Maintenance of Garden Tools.
- Utah State University Extension: Putting the Yard and Garden to Bed.
- University of Minnesota Extension: Clean and Disinfect Gardening Tools and Containers.
- University of Minnesota Extension: Caring for Winter Pruning Tools.
- Penn State Extension: Home Garden Food Safety, reviewed 2026.
- Penn State Extension: Preparing and Storing Farm Equipment for Winter.
Research reviewed October 28, 2026. Public discussions were used to identify questions about sharpening angles, oily sand, disinfectants, handle finishes and storage; instructions were resolved against Extension sources and product labels. Follow current tool, chemical and finish instructions for the exact materials involved.